| ||
| Map Name | ||
|---|---|---|
| Bio Lab | ||
| Region | Stage Number | |
| Facility | << 1 - 3 >> | |
| Waves | ||
| 6 | ||
| Starting Resources | Resources per Wave | Total Resources |
| 300 | 250 | 1550 |
| Tower Bases in Field | Starting Tower Bases | Total Tower Bases |
| 20 | 5 (7) | 20 |
Overview
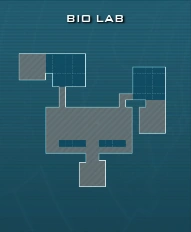
Bio Lab is the third level in the campaign Facility and is another relatively easy introduction level.
This level comes with 5 Explorer Conscripts which will attack lumes when in range.
This level also provides two tower bases with the tower known as Violator equipped. This is a very powerful tower and when unlocked, is especially great in big spaces such as this where you can make a big maze to make sure lumes keep getting attacked (while not true for this specific level, is true in general).
You will also notice that lumes come from two directions in this level, unlike the previous level, Park which was one.
This level also introduces the mine. A structure which can be picked up and placed, dealing damage to almost any lume who travels over it. If you want to learn more there is a tower you can use to build these once you unlock it called the AR-Mine Dispenser but requires player level 5.
There is also a secret area to the level which is located to the right when leaving the core area. However, to access it will you need to find a red button, pressing F will open the door.
Waves
The waves in this level are very mixed. It begins very swarm heavy so a weapon/tower that does area damage is very useful in this level but will slowly get more heavy until you approach the lume known as the Soaker.
Wave 1
- The lumes begin by spawning on the west side with the east side completely locked.
| West | East |
| 2x Walkers | |
| 21x Walker Pups |
Wave 2
| West | East |
| 3x Walkers | |
| 45x Runners |
Wave 3
- The east side is now open and lumes will not come from the west side.
- It's a good idea to bring these lumes into the main room so your Violators can help (and any other tower you may have placed).
| West | East |
| 2x Walkers | |
| x21 Walker Pups |
Wave 4
Time Limit: 1:00 Minute
- This wave is very easy without any feats enabled. You build on the side you want to dismiss or you can place more towers in the main room so they're always in use and assisting.
- How you go about this wave is completely up to the player as there is many strategies that can work.
- The two Violators will do some damage to the Soakers, but since they lack attack speed, even a simple Gatling tower can do more damage to them. On the other side, if the soakers are already exposed by rapid fire from weapons/towers, the Violators will do significantly more damage to them
| West | East |
| 2x Soakers | 3x Screamers |
| 3x Walkers |
Wave 5
- Both sides have very similar waves except the east has 3 more Walkers than the west.
- Delaying the west will result in them arriving later, meaning you have more time to deal with the west lumes so you aren't in the main room with all of them together.
| West | East |
| x1 Walker Warrior | x1 Walker Warrior |
| 3x Walkers | 6x Walkers |
Wave 6
Time Limit: 1:00 Minute
- Keep an eye on the Soaker, it has the most health in this wave and might slip by.
- The only main difference between this wave and the last is the Soaker, so your success is measured on the success of your last wave.
| West | East |
| x1 Walker Warrior | x1 Walker Warrior |
| 4x Walkers | 5x Walkers |
| x1 Soaker |
Strategy
General Tips
- Towers such as the Lightning and ACP are good against the beginning waves.
- The lumes' path to the core is quite short, so it's important to buy more time by distracting Walkers and Walker Warriors.
- If you rely on slow-attack speed towers like Violator, Lightning or level 3 Cannonc to take down Soakers, make sure you have some fast firing towers targeting them at the entrance of the maze or target them manually with fast firing weapons to bloat them up. That way the heavy hitting towers will inflict greater damage on them.
Video guides
Videos with 5 FoS, solo, untouched core:
