| ||
| Map Name | ||
|---|---|---|
| The Wilderness | ||
| Region | Stage Number | |
| Swamp | << 4 - 3 >> | |
| Waves | ||
| 10 | ||
| Starting Resources | Resources per Wave | Total Resources |
| 300 | ? | ? |
| Tower Bases in Field | Starting Tower Bases | Total Tower Bases |
| 0 | 10 | ? |
General Strategies
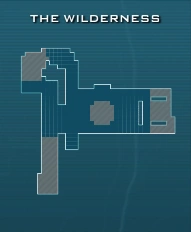
- Build your maze to funnel the East spawn into the Southwest spawn, then into the Northwest spawn.
- Place a series of Focus Towers in the nicely spaced section near the Northwest.
- Make a nice linear path from your Focus Towers toward your Core, so that you can shoot any survivors with your penetrating Voltaic Hand Cannon.
Best Loadout
Skye Autumn #1
5 Feats of Strength
Character
It was kind of hard to choose between Skye and Sweet, so it's really up to you.
I still prefer Skye Autumn for any map where you use the Drone Launcher on heavy enemies for the stacking damage.
Weapons
- Drone Launcher: never go without this.
- Voltaic Hand Cannon: Nice DPS, but really you want the penetrating shots + homing projectiles.
Towers
- Violator: Build a few in waves 1 to 3, so that you can cover a wide area of the map.
- Focus: Very useful. The majority of your towers will be this type. Build in wave 4.
You really don't need anything else.
Perks
The only wave when the enemies have any chance to even touching the Core is in Wave 3, so don't use any Core Protection perks. Instead:
- Reinforcements: Spawn an explorer upon each kill to distract the enemies. Great against any wave with Walker and Screamer types.
- Bloodletter: Very nice for Wave 3, where you have a bunch of tiny enemies. You get +100% damage after killing 4 enemies, lasting 5 seconds. No idea what the cooldown interval is though.
- Tactical Juxtaposition: For making the Drone Launcher more effective, covering more enemies, hitting them faster.
Walkthrough
- The spawn point that will spawn first will be marked with an asterisk "*". If more than one spawns at the same time, both will be marked.
Wave 1
Starting Resources
- 300 Resources
- 10 Tower Bases
Enemies
| Northwest | Southwest | *East* |
|---|---|---|
| 10 x Walker |
Reward
- 300 Resources
- 8 Tower Bases
Wave 2
Enemies
| *Northwest* | *Southwest* | East |
|---|---|---|
| 6 x Bobble Head | 3 x Walker Warrior |
Reward
- 300 Resources
- 8 Tower Bases
Wave 3 (1:00 Limit)
Enemies
| Northwest | Southwest | *East* |
|---|---|---|
| 12 x Walker | 8 x Walker | 25 x Runner |
| 12 x Walker Pup |
Reward
- 300 Resources
- 8 Tower Bases
Wave 4
Enemies
| Northwest | Southwest | *East* |
|---|---|---|
| 6 x Walker | 5 x Walker | 12 x Screamer |
| 6 x Screamer | 5 x Screamer |
Reward
- 300 Resources
- 8 Tower Bases
Wave 5
Enemies
| Northwest | Southwest | *East* |
|---|---|---|
| 10 x Walker | 1 x Armoured Heavy | 2 x Armoured Heavy |
| 3 x Spitfly |
Reward
- 300 Resources
- 8 Tower Bases
Wave 6 (1:00 Limit)
Enemies
| Northwest | *Southwest* | East |
|---|---|---|
| 2 x Walker Warrior | 1 x Soaker | 2 x Soaker |
| 10 x Snorker | 3 x Hoverer |
Combat Strategy
- Enemies start spawning from the East Spawn first, so camp near there and use your drones against the Hoverer and the Soaker.
- Once the Walker Warrior spawns from the Northwest, you might have to deal with 2 of them, or your Focus Towers could take care of most of that, while your stray drones take care of the rest. Not too hard after that.
Reward
- 300 Resources
- 4 Tower Bases <-- Notice the reduction in tower bases.
Wave 7
Enemies
| Northwest | Southwest | *East* |
|---|---|---|
| 4 x Walker | 10 x Walker | 1 x Walker Patriarch |
| 25 x Walker Pup | ||
Combat Strategy
- You might want to reinforce your walls near the core (Criss-Cross Pattern -- Do not build a solid chunk of walls).
- The boss Walker Patriarch will spawn first, so camp that entrance and try to distract it.
- Not too hard to combat the rest of the enemies as long as you have a penetrating weapon like the Voltaic Hand Cannon.
Reward
- 300 Resources
- 4 Tower Bases
Wave 8
Enemies
| Northwest | Southwest | *East* |
|---|---|---|
| 9 x Walker | 8 x Screamer | 9 x Walker |
| 2 x Armoured Heavy | 6 x Screamer | |
| 3 x Walker Warrior | ||
| 15 x Walker Pup |
Reward
- 300 Resources
- 4 Tower Bases
Wave 9
Enemies
| Northwest | Southwest | *East* |
|---|---|---|
| ? x | 4 x Hoverer | 2 x Hoverer |
| ? x | ? x | 2 x Rhino |
Combat Strategies
- Cover the east side. I'd rather you get the Spitflies yourself, rather than buying an Anti-Air Tower.
Reward
- 300 Resources
- 0 Tower Bases
Wave 10
Enemies
| Northwest | Southwest | *East* |
|---|---|---|
| 10 x Spitfly | 10 x Spitfly | 10 x Bobble Head |
Combat Strategies
- Sell all of your Towers and buy a few Level 3 Anti-Air Towers for the West side.
- Then you can simply stand near the East side, and EASILY take down the 10 x Bobble Head.