| ||
| Map Name | ||
|---|---|---|
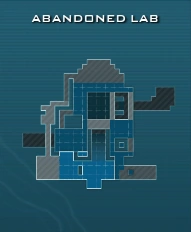
| Abandoned Lab | ||
| Region | Stage Number | |
| Giant Trees | << 3 - 4 >> | |
| Waves | ||
| 10 | ||
| Starting Resources | Resources per Wave | Total Resources |
| 400 | 300 | 3100 |
| Tower Bases in Field | Starting Tower Bases | Total Tower Bases |
| 0 | 10 | 82 |
General information
- There are time limits before waves 3, 6 & 9 - 1:30 min. each, and in these waves enemies appear only from the upper spawn points
- The reward after each wave is 300 Resources & 8 bases
- It is one of the four maps in the game, that have two cores to defend, the other ones being Cliff lodge, The labyrinth & Power relay
- There are 6 orange mines in the map (links to Youtube & Steam - [1], [2])
Enemies
(Here West spawn is the point where first enemies appear from, southeast spawn is the other one from the upper level, and northeast spawn is the lower spawn point)
Wave 1
| West Spawn | Northeast Spawn | Southeast Spawn |
|---|---|---|
| 8 x Walker |
Wave 2
| West Spawn | Northeast Spawn | Southeast Spawn |
|---|---|---|
| 5 x Walker | ||
| 6 x Screamer |
Wave 3
| West Spawn | Northeast Spawn | Southeast Spawn |
|---|---|---|
| 2 x Walker Warrior | ||
| 8 x Walker |
Wave 4
| West Spawn | Northeast Spawn | Southeast Spawn |
|---|---|---|
| 8 x Screamer | 1 x Armoured Heavy | 25 x Snorker |
| 1 x Walker Warrior | ||
| 4 x Walker |
Wave 5
| West Spawn | Northeast Spawn | Southeast Spawn |
|---|---|---|
| 25 x Walker Pup | 2 x Armoured Heavy | 1 x Soaker |
| 8 x Walker | 12 x Walker | 25 x Runner |
Wave 6
| West Spawn | Northeast Spawn | Southeast Spawn |
|---|---|---|
| 5 x Spitfly | 8 x Walker | |
| 8 x Walker | ||
Wave 7
| West Spawn | Northeast Spawn | Southeast Spawn |
|---|---|---|
| 2 x Walker Warrior | 25 x Walker | 2 x Walker Warrior |
| 8 x Walker | 8 x Walker | |
Wave 8
| West Spawn | Northeast Spawn | Southeast Spawn |
|---|---|---|
| 60 x Walker Pup | 1 x Super Heavy | 5 x Walker |
| 2 x Soaker | 15 x Walker | 60 x Walker Pup |
Wave 9
| West Spawn | Northeast Spawn | Southeast Spawn |
|---|---|---|
| 16 x Screamer | 60 x Walker Pup | |
Wave 10
| West Spawn | Northeast Spawn | Southeast Spawn |
|---|---|---|
| 1 x Hoverer Queen | 2 x Armoured Heavy | 8 x Screamer |
| 30 x Snorker | 5 x Walker | 30 x Runner |
Trivia
The map has some Easter eggs (link to Youtube: [1])
Random notes, tips & strategies
- This is one of the toughest maps among the base game's ones.
- A wise strategy is to let towers to cover the lower-level (Northeast Spawn), while you take care of the upper level.
- If you stand on the catwalk right above the Northeast Spawn, you have a long straight line-of-sight to the South and to the East, in addition to having close access to the lower-level. You can use Drone Launcher to shoot downward toward the lower-level, while using Voltaic Hand Cannon 's primary fire to attack upper-level enemies in a straight path.
- Skye and Sweet are good choices for this map. Skye Autumn can stack damage bonus with the Drone Launcher and Sweet is exceptional vs crowds and Soakers
- The Drone Launcher as an auto target-seeking, which seems useful for a large map like this, but it shines mainly vs the heaviest enemies
- The Voltaic Hand Cannon is good for enemy-seeking across a large distance, and in case enemies get close to you, they can be lined up along the ramps to penetrate all of them at once. However, it has some minor drawbacks - if the Impeccable accuracy feat is enabled, the secondary fire might not be able to outrun a runner for a very long distance, allowing it to even reach and hit the core
- The Focus is a good choice mainly vs the enemies from the lower spawn point. The lower level with the area, closest possible to the lower spawn point is susceptible to this tower, since there it can find full utility of the range
- Violators have good range and can cover both upper and lower sides, although it can be a bit of an issue to customize targetting system, depending on wave
- Lightnings can be put in U-shape/X-parts parts of the maze, so that there is more chance to damage enemies 2 or more times by it
- While the Anti-Air can help a bit in wave 6, it is mainly for coop games without the Hardcore feat, or for Survival mode, since here are just a few Spitflies
- Weapon perks can help greatly, e.g. Tactical Juxtaposition can make Drone Launcher and many other weapons more effective.
- Reinforcements and Slowing Rounds can help to distract and delay the enemies.
- Unstable Core can help a bit vs escaping enemies, although it is effective mainly vs the small Runner and Walker Pup ones
- If doing the map with 5 or even with just 3-4 feats of strength, it is recommended to be at least level 40, due to the high difficulty of the map and the capability of changing the main weapon after lvl 40 on
Videos with success in 5 Feats of strength, solo, with untouched cores