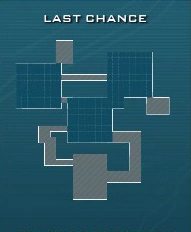
Overview
- This is the last map of Outskirts (from the The Pursuit DLC). Like all maps of this region, there are Heavy Pups and flying Bliskeblaskes among the enemies in some waves.
- It has time limits before waves 4 & 8, 1 minute each
- Lumes come from 2 directions (spawn points) - west (left) and east (right)
- The resources given are 400 in the beginning and 300 after each wave
- The bases given are 10 in the beginning and 7 after each wave, for a total of 73 in the end

| ||
| Map Name | ||
|---|---|---|
| Last Chance | ||
| Region | Stage Number | |
| Outskirts | << 7 - 4 >> | |
| Waves | ||
| 10 | ||
| Starting Resources | Resources per Wave | Total Resources |
| 400 | 300 | 3100 |
| Tower Bases in Field | Starting Tower Bases | Total Tower Bases |
| - | 10 | 73 |
Enemies
Wave 1
| West | East |
|---|---|
| 12 x Heavy Pup |
Wave 2
| West | East |
|---|---|
| 18 x Heavy Pup |
Wave 3
| West | East |
|---|---|
| 3 x Screamer Matriarch | 20 x Runner |
Wave 4 (1:00 Time Limit)
| West | East |
|---|---|
| 18 x Heavy Pup | 18 x Walker |
Wave 5
| West | East |
|---|---|
| 18 x Screamer | 6 x Hoverer |
Wave 6
| West | East |
|---|---|
| 2 x Armoured Heavy | 2 x Armoured Heavy |
| 18 x Heavy Pup | 18 x Heavy Pup |
Wave 7
| West | East |
|---|---|
| 10 x Bliskeblaske | 12 x Rhino |
| 5 x Walker Warrior |
Wave 8 (1:00 Time Limit)
| West | East |
|---|---|
| 8 x Soaker | 30 x Heavy Pup |
Wave 9
| West | East |
|---|---|
| 6 x Walker Warrior | 20 x Brood Mother |
| 6 x Screamer Matriarch |
Wave 10
| West | East |
|---|---|
| 2 x Armoured Heavy | 3 x Super Heavy |
| 20 x Screamer | 12 x Heavy Pup |
Trivia
The map has some Easter eggs (link in Youtube: [1])
Notes, tips & strategies
- While all of the three square-like fields can be used for towers, the ones, usually used are the left and the one, closer to the core. The right one is usually not used, partially due to the bosses and the Bliskeblaskes.
- Using the left one works well for a faster execution of enemies and gives a good opportunity and room for dealing with potential survivors
- Using the closer to the core one is also an option. It has good range, but it has less room to deal with potential survivors and bosses can become a bigger threat if they don't die in the range of the towers.
- The more potentially dangerous and tricky waves tend to be the 4th, the 7th and the 10th(last).
- The 4th has big crowds and can quickly become a big threat for the core. Good towers here are anti-crowd/area-of-effect ones (like ACP & Rockets) & ones, that can hit multiple enemies per attack, e.g. Orbital strike relay.
- The 7th is mostly tricky. A level 3 Anti-air tower can kill the Bliskeblaskes at ease, otherwise it might become difficult to deal with them and the durable ground enemies at the same time. High weapon damage & Armor Shredder can help.
- The 10th is also mostly a tricky one. The three Super Heavies are vulnerable to the Focus tower & mines, although they can also be killed by weapons if towers can kill the other lumes. It is wise to evade being targeted by the bosses.
Video playthroughs with links, towers, modes & results
- [link] - with ACP, Anti-air, Amp & Range spire; 5 Feats of strength; undamaged core
- [link] - with Focus, ACP, Amp & Range spire; 5 Feats of strength; undamaged core
- [link] - with AR mines, 2 ACPs & 2x Focus; 5 Feats of strength; undamaged core
- [link] - with 15 Lightnings; 5 Feats of strength; undamaged core
