(Random edits - structure, info, notes, hyperlinks, etc.) Tag: Visual edit |
(Random edits - structure, info, notes, etc.) Tag: Visual edit |
||
| Line 1: | Line 1: | ||
| − | {{ |
+ | <br />{{weapon infobox |
| + | |damage1=750 |
||
| − | |health=5000 |
||
| + | |damage2=1000 |
||
| − | |speed=Medium |
||
| − | | |
+ | |speed1=2.0 |
| + | |speed2=1.5 |
||
| + | |clip1=6 |
||
| + | |clip2=6 |
||
| + | |dps1=1500 per enemy |
||
| + | |dps2=1500 |
||
| + | |time1=3.0 |
||
| + | |time2=4.0 |
||
| + | |weakspot1=0.20 |
||
| + | |weakspot2=0.20 |
||
}} |
}} |
||
| − | ==Overview== |
+ | == Overview == |
| − | |||
| − | * Spore Pods are flying lumes featured in '''The Last Stand''' [[Downloadable Content|DLC]], and are found only on the '''Arc Islands''', in all corresponing 4 maps of this region. |
||
| − | * They usually spawn in large groups. Like other flying enemies, they will bypass towers to make a direct course toward the core. |
||
| − | *A certain time after they reach the core, they will explode in a manner similar to [[Snorker]]s, damaging the core and any nearby players. However, they do not attack players directly. |
||
| − | * When they explode, they deal 40 damage to the core, which is 1/3 of the damage, dealt by [[Snorker|Snorkers]]. |
||
| − | *Despite their resemblance to [[Snorker]]s, their weakspot is actually located on the front of their body. Like most lumes, it's indicated by a red "eye". |
||
| − | *The delay between their arrival to the core and their suicide explosion appears very specific and with random duration, probably related to certain setting or an unknown reason: |
||
| − | **If the played map is one of the first three from '''Arc Islands'''. and the player count is just 1-2, then the delay appears long, even sometimes exceeding 10 minutes, in which Spore Pods will produce their typical erratic sounds and movement, but will still not explode. At a certain position or moment they will finally suicide and this is more likely to happen faster if the player or other Spore Pods push them, although they also have a slight movement in some direction when they "dance" around the core. If there are nearby Spore Pods when a Spore Pod explodes, it will "detonate" them, making them explode as well, triggering a chain explosion. ''It is not completely clear why these lumes behave that way, although it is possible that this is related to difficulty balancing, other specific balancing measure or another unclear reason.'' |
||
| − | **If the players are three or four, then the delay is very low - Spore Pods would explode just a bit after they produce some erratic movements and sounds, regardless of which of the 4 maps is played. |
||
| − | **In the last map of Arc Islands ([[The Last Stand|8-4: The Last Stand]]) Spore pods will explode very quickly after giving a sound "signal" and erratic move, similarly to the situation with 3/4-player coop in the other three maps of the region. |
||
| + | * Fire modes |
||
| + | ** The primary fire shoots electrical orbs, that can penetrate enemies to hit multiple targets in a line. |
||
| + | ** The secondary fire shoots electrical orbs that do greater damage and seek enemies. These orbs, however, cannot penetrate to hit multiple targets. |
||
| + | * This weapon is unlocked during the very first stage. This is the first secondary weapon, available to the player. |
||
| + | <br /> |
||
==Notes & tactics== |
==Notes & tactics== |
||
| − | ===Tower Strategies=== |
||
| − | * Long-range and/or AoE towers are most effective against them, due to their clustering behavior. The [[Anti-Air]] is the best possible tower vs these lumes since its damage vs flying lumes is completely unmatched by any other tower. [[Violator|Violators]] and [[Rocket|Rockets]] are among the best alternative choices vs Spore Pods and still can be picked along with the [[Anti-Air|Anti-air]] to deal good damage vs both ground and air lumes. It is good to put these towers with some space between them to grab a bigger area in range, therefore not allowing any flying things to penetrate and distributing a bit better the damage. |
||
| − | * Due to the '''Spore Pods'''<nowiki/>' large numbers, some supplemental towers may be needed. A few shorter-range towers, such as [[Friendship Laser]]s or [[Lightning]]s, placed nearer to the core could help finish-off any that were missed although they might need a [[Range Spire]] for better reach. |
||
| − | * Due to its range, steady rate of fire and sizable AoE, the [[Kairos]] is effective at slowing flying enemies, making it a good support tower for the '''Arc Islands'''. |
||
| − | |||
| − | |||
| − | ===Player Strategies=== |
||
| − | * Their weakspot is not difficult to hit, as it is fairly large, even bulging-out enough to make hitting it from the sides possible. And like other flying enemies, their path toward the core is fairly straight, so one can usually see the weakspot clearly so long as they stay close to it. |
||
| − | * [[SiMo]] is arguably the best character against '''Spore Pods''', due to his passive accuracy and crit bonuses. |
||
| − | * The four high-crit weapons ([[Sniper Rifle]], [[Ballista]], [[Plasma Rifle]] & [[Nailgun]]) are all effective at taking them out before they reach the core, due to their accuracy and high weakspot damage. One needs to compensate for gravity and distance when using [[Ballista]] though, so it requires a bit more skill. |
||
| − | * Explosive weapons are also effective, due to '''Spore Pods'''<nowiki/>' tendency to spawn close-together. Adding [[Long Range Specialization]] will increase their AoE significantly. |
||
| − | *'''Spore Pods''' present a good situation for [[Penetrator Rounds]], since there is usually another flying enemy close behind, and they generally share the same path. |
||
| − | *'''Spore Pods''' and [[Snorker|Snorkers]] don't trigger [[Shocking Revelation]] when they damage the core. |
||
| − | |||
| + | * The piercing ability of the primary fire makes this weapon extremely devastating in mazes with long, straight paths. |
||
| + | *The primary mode is preferrable if the player can hit multiple lumes in a line and is better when being able to hit weak spots. |
||
| + | *The secondary fire is good when the player hardly can aim properly and when facing single enemies with armour if not being able to hit their weak spots. |
||
| + | *If facing single enemies, it appears that both fire modes have same DPS vs lumes with no armour, but: |
||
| + | **if the player can hit weak spots, the primary fire is mostly, a better option, since it deals 20% more damage. |
||
| + | **the secondary fire deals more damage vs armoured lumes even if their armour is low, although if these have exposed weakspot, the primary can show better, e.g. it is mostly preferrable when fighting [[Walker Warrior|Walker Warriors]], but it might be a bit weaker vs [[Screamer Matriarch|Screamer Matriarchs]] (if the vulnerable back cannot be hit). |
||
| + | **both modes still need some accuracy - if the lume is too close, the secondary fire still can miss and go behind the desired target. |
||
| + | *The size of the shot is rather large as well, allowing it to hit short enemies such as [[Runner|Runners]] with ease. |
||
| + | *While both fire modes are relatively good vs [[Runner|Runners]] and [[Brood Mother|Brood mothers]], if the [[Impeccable Accuracy]] feat is enabled, then the secondary fire might not be able to outrun them for very long (even chasing them until they reach the core and hit it), thus making it viable mainly if they are coming closer (to the player) rather than running away. |
||
| + | *The secondary fire tends to lead the projectile to the '''center''' of the lume's body in proximity. |
||
| + | **This technically means that this fire mode is '''not''' recommended vs [[Bobble Head|Bobble heads]], because its target-seeking nature tends to lead the projectile to the invulnerable mid-part of their body instead of their head, and is '''not''' any good vs [[Fiskeplaske]] either. On the other side, it might be situationally better vs [[Hoverer|Hoverers]] & [[Hoverer Queen|Hoverer queens]], e.g. if having trouble aiming at their backs from far distance or while the player is among dangerous lumes, although it is still better to be fired when being behind them. The projectile that doesn't deal damage by the hit will still apply [[Sweet Autumn|Sweet]]'s burning and [[Skye Autumn|Skye]]'s warming-up, but will '''not''' trigger [[Slowing Rounds|Slowing rounds]], [[Synergy]] or [[Exposure Rounds|Exposure rounds]]. |
||
| − | {{Sanctum 2}} |
+ | <br />{{Sanctum 2}} |
Revision as of 21:02, 23 September 2021
| Voltaic Hand Cannon | ||
|---|---|---|
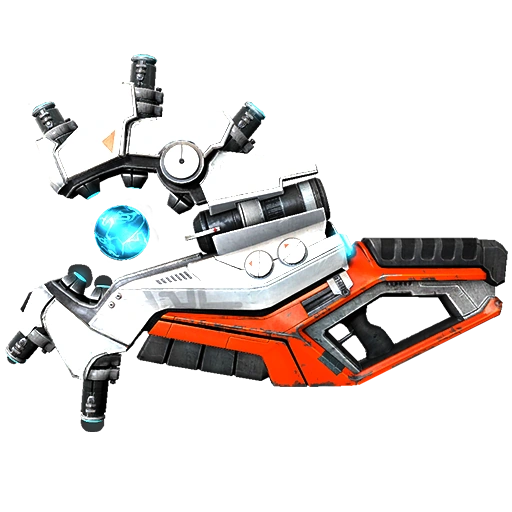
| ||
| Primary Fire | Secondary Fire | |
| Damage | 750 | 1000 |
| Shots per Second | 2.0 | 1.5 |
| Magazine Size | 6 | 6 |
| Damage per Second | 1500 per enemy | 1500 |
| Sustained Fire Time (seconds) |
3.0 | 4.0 |
| Weakspot Damage Bonus | 0.20 | 0.20 |
| Reloading Time (seconds) |
{{{reloading time}}} | {{{reloading time}}} |
Overview
- Fire modes
- The primary fire shoots electrical orbs, that can penetrate enemies to hit multiple targets in a line.
- The secondary fire shoots electrical orbs that do greater damage and seek enemies. These orbs, however, cannot penetrate to hit multiple targets.
- This weapon is unlocked during the very first stage. This is the first secondary weapon, available to the player.
Notes & tactics
- The piercing ability of the primary fire makes this weapon extremely devastating in mazes with long, straight paths.
- The primary mode is preferrable if the player can hit multiple lumes in a line and is better when being able to hit weak spots.
- The secondary fire is good when the player hardly can aim properly and when facing single enemies with armour if not being able to hit their weak spots.
- If facing single enemies, it appears that both fire modes have same DPS vs lumes with no armour, but:
- if the player can hit weak spots, the primary fire is mostly, a better option, since it deals 20% more damage.
- the secondary fire deals more damage vs armoured lumes even if their armour is low, although if these have exposed weakspot, the primary can show better, e.g. it is mostly preferrable when fighting Walker Warriors, but it might be a bit weaker vs Screamer Matriarchs (if the vulnerable back cannot be hit).
- both modes still need some accuracy - if the lume is too close, the secondary fire still can miss and go behind the desired target.
- The size of the shot is rather large as well, allowing it to hit short enemies such as Runners with ease.
- While both fire modes are relatively good vs Runners and Brood mothers, if the Impeccable Accuracy feat is enabled, then the secondary fire might not be able to outrun them for very long (even chasing them until they reach the core and hit it), thus making it viable mainly if they are coming closer (to the player) rather than running away.
- The secondary fire tends to lead the projectile to the center of the lume's body in proximity.
- This technically means that this fire mode is not recommended vs Bobble heads, because its target-seeking nature tends to lead the projectile to the invulnerable mid-part of their body instead of their head, and is not any good vs Fiskeplaske either. On the other side, it might be situationally better vs Hoverers & Hoverer queens, e.g. if having trouble aiming at their backs from far distance or while the player is among dangerous lumes, although it is still better to be fired when being behind them. The projectile that doesn't deal damage by the hit will still apply Sweet's burning and Skye's warming-up, but will not trigger Slowing rounds, Synergy or Exposure rounds.